Category: Tips & Tricks

  • Steps to Activate Official YouTube Dark Mode

    Steps to Activate Official YouTube Dark Mode

    Current YouTube UI

    I’ve been using the dark version YouTube for a long time with the help of a chrome extension called Magic Actions for YouTube. Magic Actions is an amazing extension, you can tweak YouTube a lot. Not going to talk about the extension but do try it.

    YouTube is constantly working on improving our viewing experience and most of the features are in beta. But today @ow with the help of @keesplattel discovered a way to enable YouTube dark mode officially. Along with dark mode, you get a new interface as well. I’ve seen this interface while using a friend’s YouTube account, it was a browser specific UI, the same account had a different UI when I tried it from a different account.

    Now let’s get the new UI and the new dark mode.

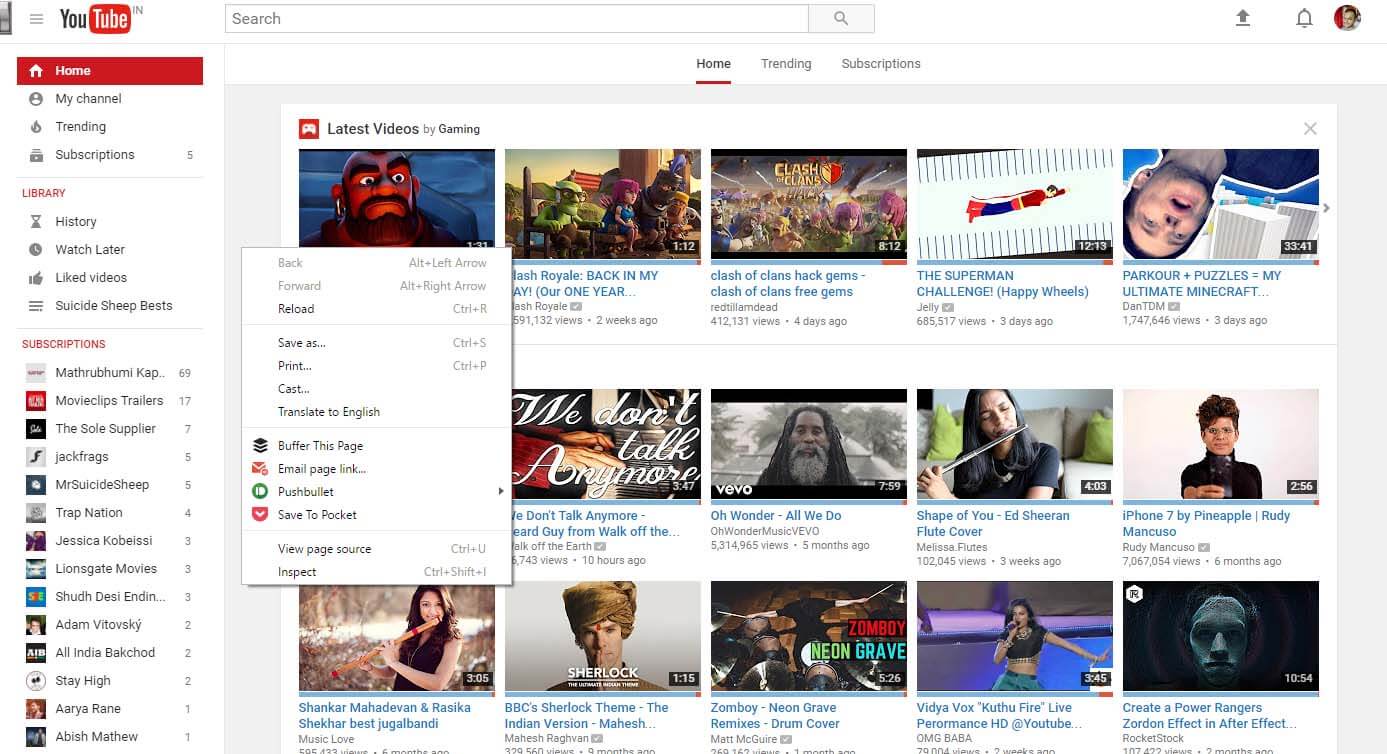
    1. Open console by right clicking anywhere in the viewport of the browser and click on Inspect or press the keys Ctrl+Shift+I


    2. Paste document.cookie=”VISITOR_INFO1_LIVE=fPQ4jCL6EiE” into the console and press Enter

    Steps to Activate Official YouTube Dark Mode - 06 -Viral Media Today


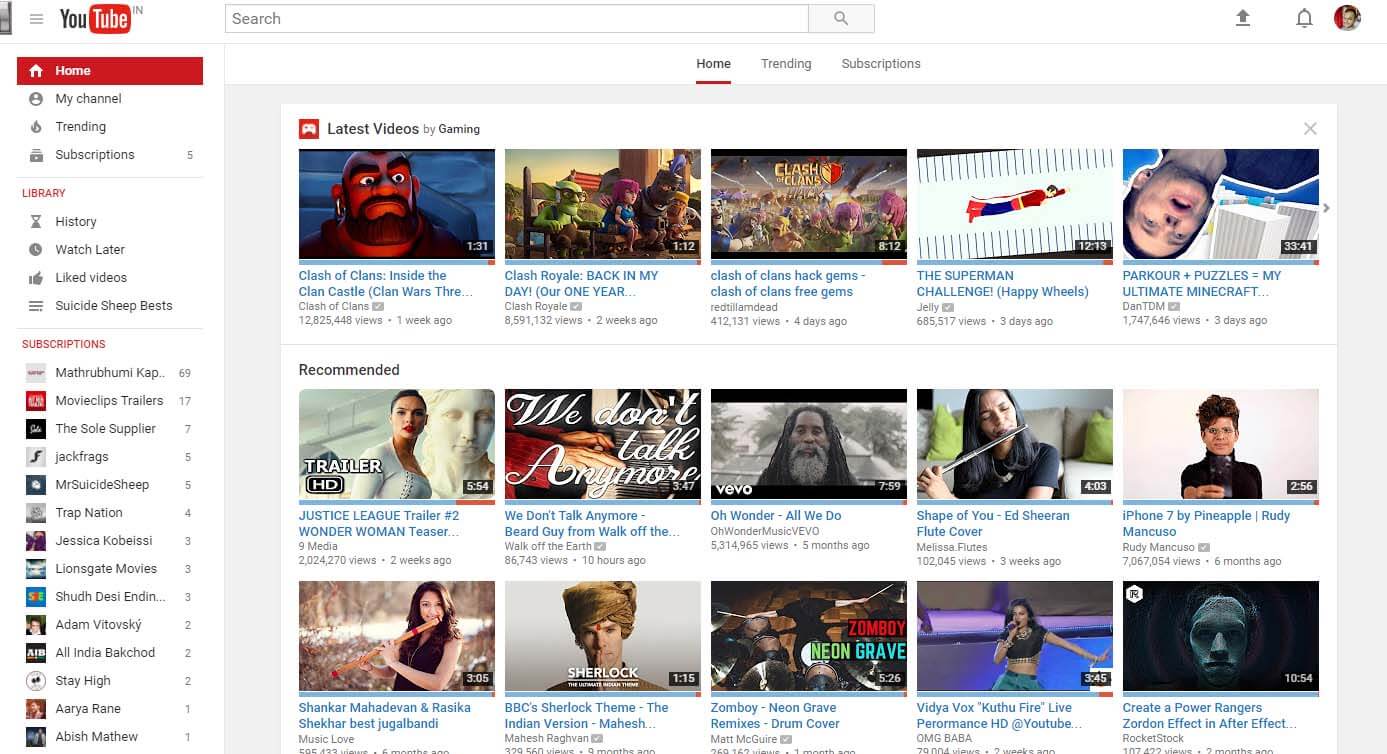
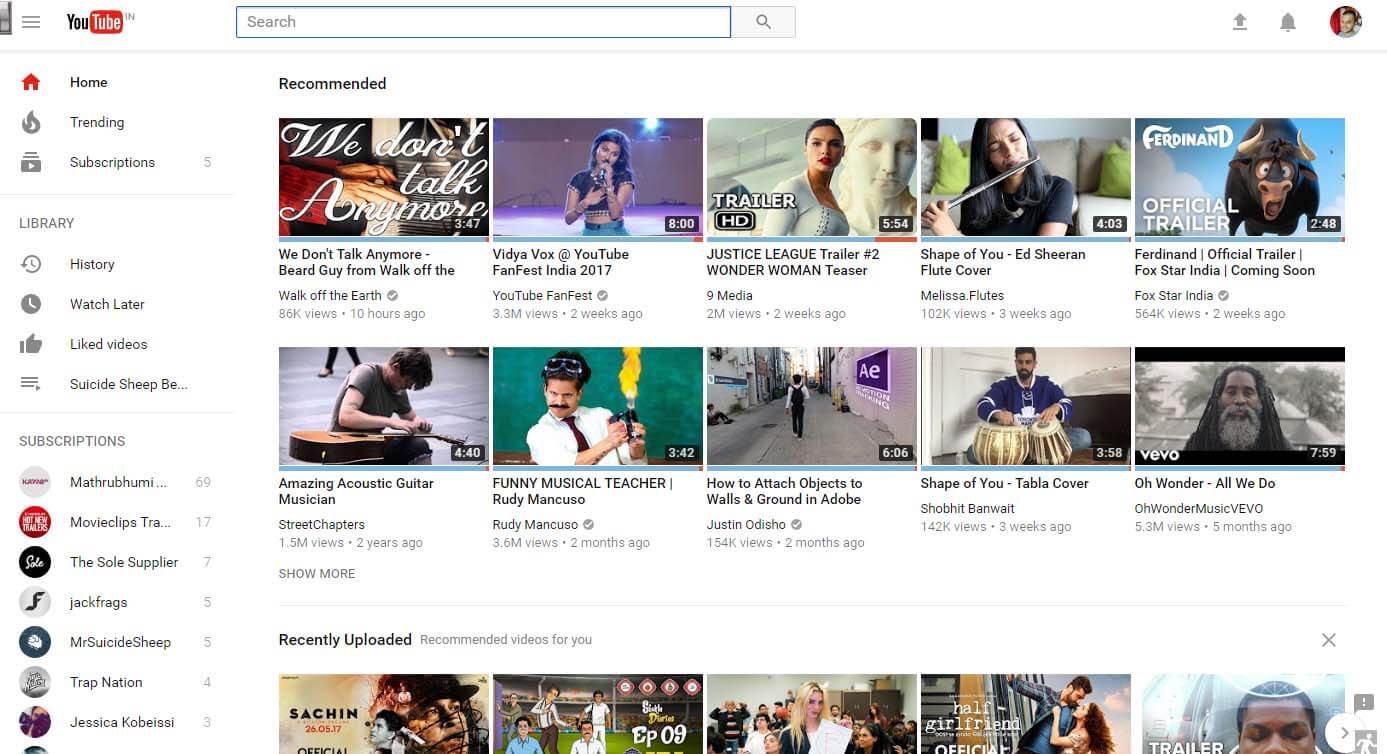
    3. Reload, you can see that you already have the new UI.


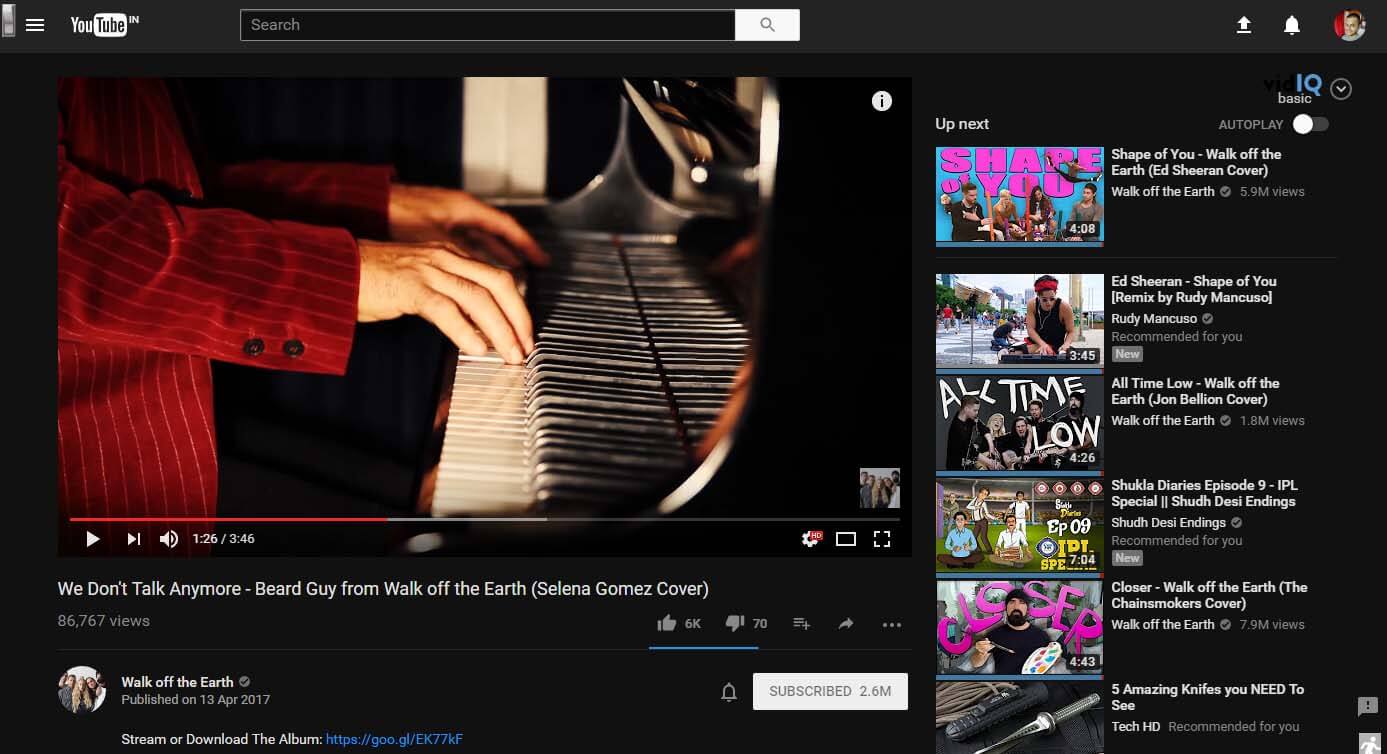
    4. Click your avatar and from the dropdown click on Dark More: Off and enable it. 


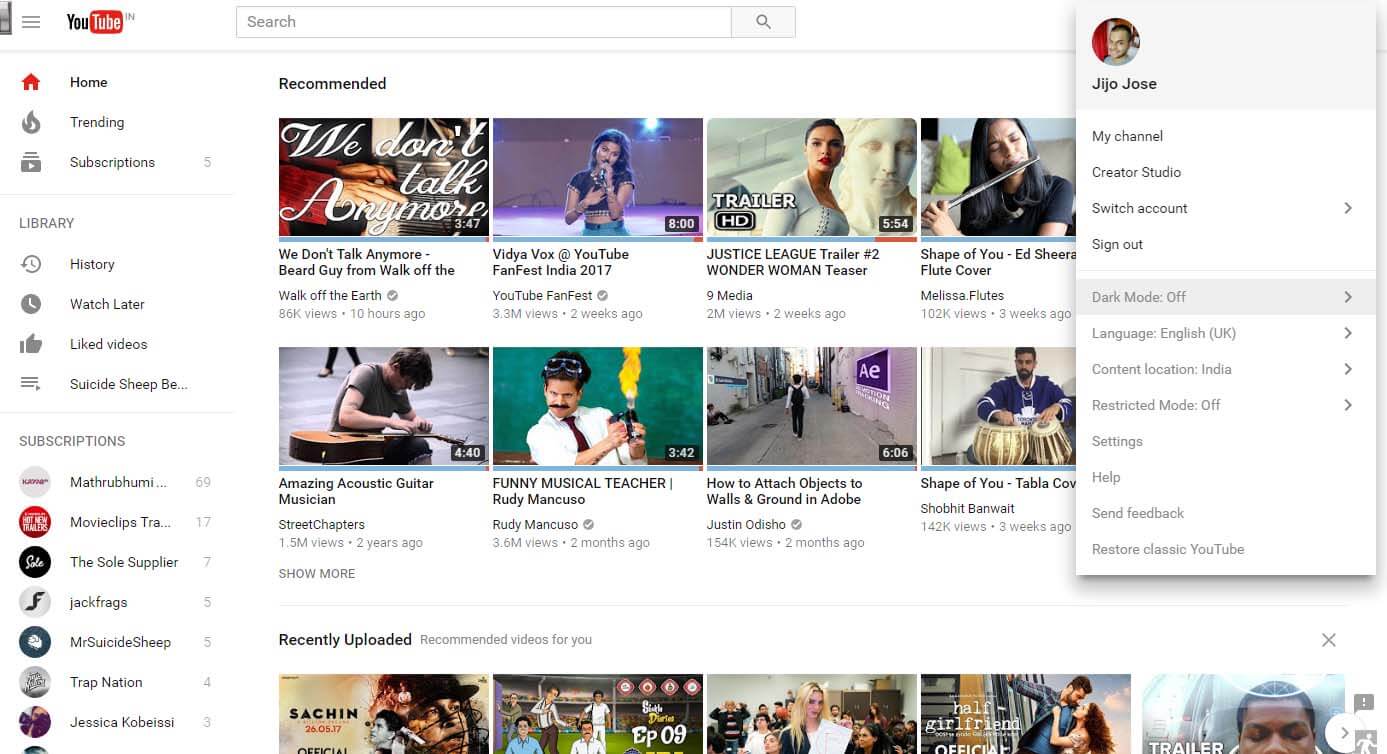
    5. Dark mode enabled, Enjoy!

    How to Activate Official Dark Mode in YouTube - 05 - Viral Media Today

    TLDR;

  • Upload to Instagram from your Computer – PC & Mac

    Upload to Instagram from your Computer – PC & Mac

    Instagram user base is rapidly growing and one thing everyone wants to do is to upload to Instagram from their personal computer. Wouldn’t it be great, if it is possible to upload to Instagram from your computer. Instagram does have a website which can be accessed from our computer, but only supports viewing, liking, following & commenting. We cannot upload to Instagram using their website.

    A workaround for this is by using a 3rd party software named “Gramblr“. Gramblr helps you to upload your image on Instagram, you can also captions. Once it successfully uploads your picture, it gives the option to share your uploaded picture on Facebook & Twitter. Other links you get once upload is completed are Direct Link, Web Link, HTML Code, Forum BBC Code. Currently Gramblr supports Windows & Mac operating systems.

    The image you want to upload should be optimized for Instagram and all the filters you want to apply should be applied beforehand. Gramblr doesn’t have any option to edit images. Make sure your image dimension is 650px by 650px. Your picture won’t be uploaded if the dimension is not correct, also the file size should not exceed 500kb.

    Uploading to Instagram through Gramblr is simple:
    1. Open Gramblr Photo Uploader
    2. Sign in to Instagram
    3. Choose the photo you would like to upload
    4. Add a caption
    5. Hit upload, that’s it.

    Upload A Picture to Instagram from your Computer - PC & Mac

    If you are not good with Photoshop, you can try some free online image editor on which you resize, apply filters, do crazy stuffs, etc… One of my favorite editor is Pixlr by Autodesk. Out of the 3 options on the site I recommend Pixlr Express, it is good for both beginners and professionals. If you are in a hurry and need some pretty cool effects try Pixlr O-Matic, you can do epic stuff to your image in less than a minute. If you want to get your hands dirty try Pixlr Editor, you will get a lot of different options which are not available to Pixlr Express & Pixlr O-Matic.

    Gramblr is a lifesaver for Social Media Managers. Most of the image they get to upload are in different dimensions and Pixlr+Gramblr will help them create amazing posts. There are moments when you find an old picture on your computer and wants to upload that to Instagram but is too lazy to transfer it to mobile. Gramblr is here to help these lazy ones.

    What’s your take on Gramblr? Do you know some other softwares like Gramblr? Let me know through comments.

  • Learn How to Skip Spotify Ads

    Learn How to Skip Spotify Ads

    Spotify Free users will understand the pain of listening to those annoying ads. The worst part is they keep on repeating the same jingle for a week. Spotify ads are the most annoying thing I’ve ever heard. You know what happens if you decrease the volume (Spotify or system volume). If you haven’t tried decreasing the volume during an ad, try it. You will notice that the ad pauses. Brilliant idea by developers, but a pain for our ears.

    Now lets see how to skip Spotify ads. We are going to do this without any help of any external or 3rd party software. First, you need to install the a Spotify app called “MusiXmatch”. Use the App Finder to get the app. SO how a lyrics application going to help us, right? If the app is open before an ad starts, you can click on the lyrics to fast forward the ad. Check out the video to see how I did it.

    Easy, right?

    Let me explain this again:

    1. Install “MusiXmatch” inside Spotify
    2. Use “Musixmatch” while listening
    3. Once the ad starts, click on the bottom of the lyrics, which is on the screen. You don’t have to scroll down to the end, just click on the lyrics, which is shown on the screen. (See video)
    4. Optional: Use the “All Lyrics” option to skip faster (see image 1)
    5. Enjoy, ad free Spotify. 🙂
     Skip Spotify ads - MusiXmatch
    Image 1: MusiXMatch Spotify App UI

    In my opinion, this is not against Spotify rules. We are using a Spotify app and not any 3rd party software to skip the ads. We didn’t tamper with the app so that the app behaves like this. It’s already there and we are just using it.

    I didn’t want to share this trick when I found it, but sharing is caring. So enjoy. Free Spotify without ads. Make sure you don’t post this on Spotify official channels, chances of getting this patched will be high. Let’s enjoy free Spotify for sometime.

  • Create a Ultra Strong Password and Protect yourself Online (Infographic)

    Create a Ultra Strong Password and Protect yourself Online (Infographic)

    Last month I wrote about “Top 25 Worst Passwords“. If you are still using a weak password, you are an easy target for a hacker. Your online life is in great danger.

    There is no use worrying after someone takes hold of your accounts, especially your online bank details. Basically your whole online life is at stake with weak passwords.

    So do you know what a strong password means? There is nothing called hack-proof passwords. Every password can be cracked, but depending upon the complexity of the password, the time taken to crack a password can vary from 1 min to 1.49 million centuries.

    Some of the best practices I use to protect my online life include using lower and upper case characters, using numbers and special characters, keeping password length more than 10 and changing passwords every 2 months.

    Try to use different passwords for different sites, this reduces the risk of getting all your account hacked if one of the sites you use gets hacked and data is leaked. Recently the HeartBleed bug shook more than 60% percent of internet. Read more about this on the official site. No case of data leakage due to HeartBleed was reported. God knows how many sites were compromised before the bug was discovered. Better to change all the passwords. But before changing the passwords make sure that the website you are changing the password has rolled out a fix for the bug. It’s pointless changing the password before the server is fixed. You can check the blog of the site and find out whether they have fixed the issue. Most of the sites mailed it’s users about the bug and about the fix they have implemented.

    Check out the infographic below and find out more practices you can do to create an ultra-strong password.


    Create an ultra super strong password
    Source: WhoIsHostingThis?

  • Windows 8 & Windows 8.1 Keyboard characters misplaced [Fixed]

    Windows 8 & Windows 8.1 Keyboard characters misplaced [Fixed]

    After upgrading to Windows 8 I had an issue with keyboard characters. Whenever I type ‘@’ I get ‘ ‘ and vice versa. Also a lot of the other keyboard characters were in the wrong position. Another one is, when you type ‘ | ‘ you get ‘ ~ ‘.

    I thought it was an issue with Windows and waited for an update to fix this. Months passed and it wasn’t fixed even after lots of updates. Then came Windows 8.1, thought it would be fixed along with Windows 8.1 update. But it wasn’t. So after messing around with my comp I found out the issue and the fix.

    What is the issue?

    This is an issue with the Keyboard layout of for English United Kingdom Keyboard.

    Steps to Fix this.

    We can easily fix this by changing our keyboard language to English United States. You will have to add US English to the list if you haven’t already. Follow the below steps to add English US to languages.

    1. Open Control Panel and click on Add a language which is under Clock, Language and Region

    2. Click on Add a language button on the new page which appears.

    3. Scroll Down to ‘E’ and double click on ‘English’

    4. Now Double Click on ‘ English (United States) ‘

    5. It will be added to your languages list. Click on English (United States) and use the move up button to make it default by moving up English (United States) to the top.

    6. Trying to type now and check whether your issue has been fixed. If not, try restarting. It will be fixed for sure.

    Windows 8 & Windows 8.1 Keyboard characters in</a srcset=

    Hope this fixes your issue. If this helped, please like and share the article. For more help use the comments and I will try my best to help you.

  • Get Back ‘Stop Download’ feature on YouTube Videos

    Get Back ‘Stop Download’ feature on YouTube Videos

    Some days back YouTube removed the “Stop Download” feature from their player. They also removed video pre-buffering. In this article I will help you to get the “Stop Download” feature using bookmarklet/userscript.

    How to Stop YouTube Video from Downloading

    Method 1: Bookmarklet

    This is the easiest method and will work on all browsers. (Google Chrome, Mozilla Firefox, Internet Explorer, Apple Safari, etc). To use it, drag and drop the above bookmarklet to your Bookmarks toolbar. To stop a YouTube video while watching, just click on the bookmarklet and the video will stop downloading.

    Stop YouTube Video (bookmarklet)

    Image courtesy: www.thelacunablog.com

    Method 2: Userscript

    Userscript will give you a button below your YouTube player to stop the download. Userscript download link is provided below.

    Download

    Stop Youtube Video Downloading

    Steps to install Userscript

    • In Firefox, you will have to install the Greasemonkey add-on. After that, open the userscript page provided above and click on the install button.
    • In Chrome, you need to download the Userscript on your computer by right-clicking the Install icon and select Save link as. Then go to Tools > Extensions, drag the downloaded script into the Extensions page and click install.

    Don’t forget to share this with your friends.

    Via [thelacunablog.com]

  • Disable the ‘Seen’ feature on Facebook

    Disable the ‘Seen’ feature on Facebook

    If you are a Facebook user I don’t have to tell you the about the annoying feature Facebook introduced recently.

    Facebook Chat Box Seen DeactivatedSome people like it, but some wants the feature to be removed or an option to disable the feature. Reason being its intrusion on our own privacy. We all have an annoying person on our list who we don’t want to talk and ‘seen’ feature shows the person that we have seen their message.

    Facebook doesn’t provide any option to disable this feature. This feature uses a Java-script which activates when we see a message and signal Facebook server. We are going to disable this code. Don’t worry, no coding required, we will be using a simple software from Cross Rider.

    This software is for people using Google Chrome. The software installs an extension which disables the script.

    Will make another tutorial for more browsers later.

    Installing ‘Chat Undetected’:

    [ibs text=”Click Here to download ‘Chat Undetected’ ” tooltip_text=”” color=”black” icon=”download” border_radius=”small_radius” size=”small” link_url=”http://crossrider.com/install/14917-chat-undetected” link_target=”_blank”]

    • Download ‘Chat Undetected’ from the above link.
    • Install.
    • That’s it.

    An issue you will face after installing the software is that all your messages you received will be marked unread. You will be never able to mark it as read with the extension enabled. A simple solution will be disabling the extension once in a while and mark all messages as read.

    To Disable an extension in chrome:

    1. Press Alt+E and then S.
    2. On the left side of the new tab which opened, click on Extensions.
    3. From the list of extensions
    4. Now go to Facebook and mark all your messages to read.
    Disable Facebook Chat Seen Feaure
    Disable ‘Chat Undetected’ to mark messages are Read

    Hope this article was helpful, if it you find this helpful, please Like or Tweet. Also, don’t forget to let your friends know about this article.

    If you run into any trouble while installing let me know through the comments and I will be happy to help you.